Printmaking Exploration
- Daniela Reyes

- Apr 21
- 20 min read
Join me on an exploration of the wonderful world of printmaking!
My favorite part of art class during my school days was printmaking. It was such a refreshing change from traditional drawing or painting because I could make multiple prints of my blocks and layer them how I wanted to. It allowed me to experiment with different colors and combinations without the worry of messing up my original block. Revisiting printmaking as a college student certainly brought back some joyous memories from art class!
When it comes to printmaking, there are many different types of prints you can explore. For the purpose of this blog, I will be delving into 4 different types:
Monotypes - gelli plates and oil transfer drawings
Relief-printing - linocut, foam prints, and collagraphs
Intaglio - drypoint
Screen printing - DIY screen
Monotypes - Gelli Plates
Monotype: A monotype is a one-of-a-kind print. It starts with a clean surface (like the gelli plate), then you add ink and whatever other materials you want to create an image that will make an impression on paper. Most of the ink will be removed with the first print, but you can make "ghost" prints from the leftover ink that will vary greatly from the first. Gelli plate printing is an example of a monotype.
Monoprint: A monoprint is a single impression of an image made from a "reprintable" block. No two prints are ever identical, however, for you can vary the inking of the block and create a series with those varying prints if you wish. Linocuts and foam prints are a type of monoprinting.
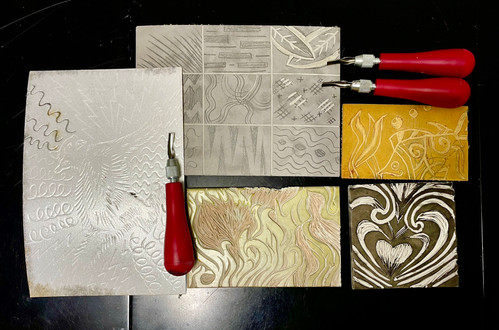
Click on images to expand!


MATERIALS
Gelli plate
ALT: DIY gelatin plates from real gelatin!
Soft body acrylic paints
Palette knife or spoon
Paper
Brayer and glass tray
Hand sanitizer or baby wipes
Paper towels
Stencils - You can make them yourself or use what you find around
Textural objects - Things like feathers, bubble wrap, lace, stamps, plastic, nets, etc. Try anything :)
Gelli-Plates
Click on images to expand!


Steps:
Start off by putting a few dots of paint onto your gelli plate and spreading it into a translucent coat with the brayer. If there's not enough paint, add more. If it's too much and not translucent, perhaps start over. Feel free to combine colors by blending them completely or leaving it splotchy for cool effects!
Add as many stencils or textural objects as your little heart desires. Then, get a sheet of paper to put on top and rub it hard so the paint transfers.
After you rub the paper hard enough, pull it off to reveal your prints! The negative areas are from the stencils, and this technique is called "stencil plate."
After completing step 3, there will still be paint left over on your gelli plate. If you place another piece of paper on top of that gelli plate again, more textures of the stencils or objects will appear in this new print. This is called a ghost print. For example, the 5th pic shows my first print vs. the ghost print. Notice how the ghost print captured the texture of my net even though the original one couldn't due to thick stencils.
Now that you've learned the basics, you can layer prints! Place the same paper on top of a new gelli plate covered with stencils or designs. Repeat multiple times.
Check out these videos for visual aids!
Techniques & Tips
Found objects and stencils are essential for gelli printing and adding texture. It's important not to put too many materials between the gelli plate and paper, though, otherwise not much of the paint will show. Layering is also a great way to play with composition and color. I suggest using a ghost print as a base for the other layer(s) you wish to place on top. Let it dry for a few minutes, and then create "stencil" prints on top of it as many times as you'd like. There are no rules to this, so be as chaotic as you'd like with the composition. As for color, I'd strongly suggest layering with contrasting colors (light and dark or complementary). If using analogous color combinations, it'll be very hard for your textures or stencil marks to show. Don't be afraid to explore and have fun!
History
Gelli printing is a form of monoprinting that evolved from traditional gelatin printing. This dates back to the early 20th century where homemade gelatin plates were used for creating textured, layered prints without a press. In the 2010s, the Gelli Arts company popularized a more durable, reusable synthetic gelatin plate that made the process more accessible to artists, educators, and hobbyists. The technique encourages experimentation with stencils, textures, and mixed media!
Contemporary Artists
Click on images to expand!


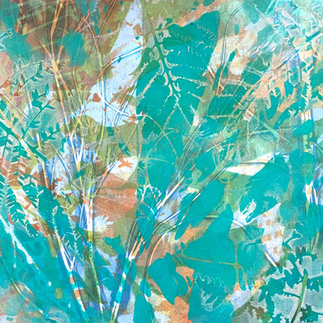
Lucy Brydon is a Scottish artist and educator renowned for her innovative work in gelli printing and monotype techniques. She draws inspiration from the rich flora, fauna, and folklore of Scotland to create layered, textured artworks that incorporate elements of collage and painting. Brydon's approach to art is deeply influenced by her appreciation for natural textures and the narratives they can evoke. Gelli printing has the ability to produce intricate layers and textures, therefore it allows her to craft pieces with hidden depths and stories.
Click on her name to see her website or check out her Pinterest board for inspo! https://uk.pinterest.com/deekerslake/gelli-printing-lucy-brydon/
Click on images to expand!


Kim Herringe is an Australian printmaker and educator based in Maleny, Queensland who creates expressive monotype and gelatin plate printing techniques. Her work is deeply inspired by the natural beauty of the Sunshine Coast hinterland and also incorporates botanical elements and textures.
Monotypes - Oil Transfer Drawings
Click on the image to expand!

Materials
Aluminum foil
Paper
Oil paint
Palette knife or spoon
Pencil
Oil Transfer Drawings
Click on images to expand!


Steps:
Start by covering your aluminum foil with a brayer or a brush using oil paint. Make sure it's the same size as your paper.
Lightly place a piece of paper (DO NOT PRESS DOWN) on top of the spread oil and use a pencil to draw.
Lift paper to reveal your drawing and repeat until it's cleaner (notice how my cat came out clearer the second or third time compared to the blob of ink in the middle pic
Here is a better video tutorial by Winsor & Newton of another and an arguably cleaner way of doing this transfer:
Techniques & Tips
It's imperative to not apply too much ink to your surface, otherwise your paper will retain a majority of the ink and your drawing will not show very well. You can also retry a second or third time by applying another piece of paper and the outcome should be much cleaner since there will be less ink on your surface. Alternatively, the video above provides another method that can be useful.
History & Artist Paul Klee
Click on images to expand!


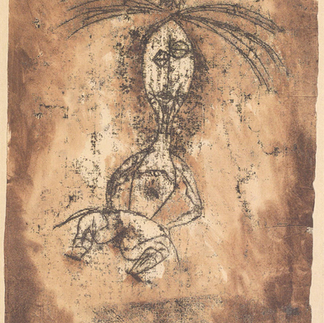

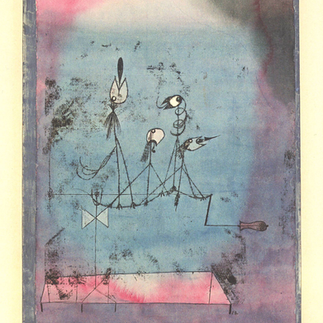
Oil transfer drawing is a printmaking technique that involves transferring a drawing made with oil-based materials like oil paint onto another surface like paper by applying pressure with tools like a pencil. Paul Klee, a Swiss-German artist and Bauhaus teacher, began using this method around 1919 as a way to combine elements of drawing and printmaking without the need for a press. He enjoyed oil transfer drawing because of its spontaneity, subtle textures, and layered effect. It matched his interest in line, abstraction, and childlike expression - this is something to think about when you choose your preferred printmaking medium. Klee could experiment freely with this type of transfer to create highly textured and almost dreamlike compositions that obscured the line between drawing and print.
Relief Printing - Linocut
Relief Print: A relief print is a printmaking technique where the design is carved or cut into a surface (like linoleum or foam) so that the image appears raised on the surface. The raised areas are inked and then transferred to paper by pressing the surface against the paper. Then voilà! The reflection of your image has been printed.

MATERIALS
E-Z-Cut Printing Blocks
Carving tools for block printing, varying blade sizes
Block printing ink
Paper
Brayer and glass tray
Baren
Palette knife or spoon
Click on the image to expand!


Steps:
Create a design on your linoleum blocks with a pencil. Keep in mind the lines are what you'll be carving away and are the "blank" part of your prints. Also, remember that your design will be backward when printed!
Apply a few dots of paint onto your glass plate then spread with the brayer. Always start small, then apply more if needed. If you want gradient effects, apply 2-3 colors parallel to one another and roll in ONE direction.
Roll the ink onto your blocks. Apply as many layers until fully covered (but not too many or paint will go into the crevices)
Put your paper on top of the linoleum block and use a brayer to rub the ink into the paper. Press and rub firmly. Peel the corners to sneak a peak of the print and see which areas need more rubbing.
Peel the paper completely to reveal your prints! Feel free to add more layers like how I did with the elephant
Techniques & Tips
For linocuts, the thickness of the linoleum cutters matters when it comes to how much you want to carve out of your block. Always remember that whatever you carve out will be the blank (the one without paint) space of your print, and it will show up backward as well. I remember doing a project in high school where I carved out names normally and they all came out backward, whoops! Also, the higher the number on the cutters, the wider the cuts will be. Wide cutters are great for carving out large areas and thin cutters are great for finer detail. Hatching and patterns can add many textures to your work and make it more intricate. Lastly, be careful not to use too much paint (when you lift your brayer from the glass it should sound slightly sticky), or else it'll go into the crevices of the carvings.
History
Linocut is a relief printmaking technique that started in the early 20th century. It used linoleum as a softer and more accessible alternative to wood for carving. German Expressionists like Ernst Ludwig Kirchner first adopted linocut. It later became popular for its bold lines and graphic quality. Linocut is especially prominent in politically charged art and social commentary because of its affordability and easy reproduction. This made it ideal for propaganda, protest, and community-based artwork.
Contemporary Artist
Click on the image to expand!

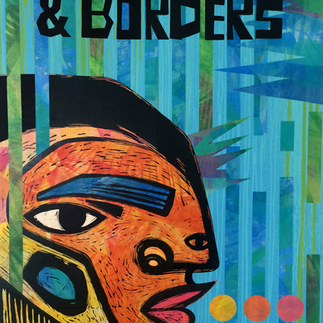


Favianna Rodriguez is a Latin American artist whose artwork talks about migration, gender justice, climate change, & racial equity. Her pieces focus on joy and healing while also challenging hurtful myths and cultural practices. This creative practice is a way for her to record her human experiences as a woman of color by using creative expression & personal transformation. She embraces printmaking for its accessibility and power to disseminate messages widely, stating that reproducible art like printmaking can educate, organize, and liberate communities. Her colorful works serve as tools for activism and community engagement.
Check out this video by Favianna to see how you can combine linocuts with monotypes!
Alternative Relief Printing - Foam Block Print
Click on the images to expand!


MATERIALS
Same materials as linocut, except replace the printing blocks with foam printing plates and use a pencil/pen instead of carving tools. You can also use regular acrylic paint and not necessarily block printing ink
Steps:
Draw your design on a sheet of paper. Like linocut, the lines are what you'll be carving away and are the "blank" part of your prints. Your design will be backward as well when printed.
Place paper on top of the foam plate and secure it with tape on one side. Trace your lanes HARD with a pencil or pen so they make indents on the foam. Alternatively, if you wish to freehand, you could draw directly on the foam.
Follow the same rest of the steps as linocut (Steps 2-5)
Scaffolding with Foam Prints to Prepare for Linocut
This type of printmaking is great to use as an introduction to printmaking for beginners. In the classroom, it can be used as scaffolding for those who want to practice in a low-stakes assignment before officially carving. It helps them practice carving (in this case, creating indents with the pencil) and how it would affect the final look of the print (blank spaces vs colored spaces with ink). It's also an affordable method so can try it out multiple times. You could draw directly onto the foam, place a photo on top of the foam and trace the outlines, or create a drawing and transfer the drawing onto the foam as well. Press just hard enough that noticeable indents are made, but not too hard or you'll poke through the foam.
Relief Printing - Collagraphs with a Twist
Collagraph: A collagraph is a printmaking technique where a collage of textured materials is glued to a printing plate. This creates a textured surface that's then inked and printed.
Click on the image to expand!

MATERIALS
Sturdy cardboard or block
Hot glue gun
Found materials (beads, wires, mini tiles, etc.)
+ Clay as a new printing surface instead of paper!


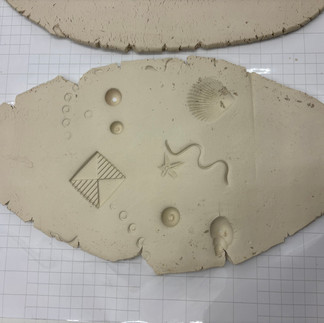


Steps:
Scavange for found material!
Play around with your design, and once you're happy, hot glue it onto the plate. If using wire and a foam board like me, you can design a drawing with the wire and stick it into the foam board instead of hot gluing it.
Press your collagraph into the clay, and you now have a new print!
Techniques & Tips
Collagraphs are great because you can incorporate multiple different kinds of found material, but the thickness and height of the material are important to keep in mind to ensure a successful print. If one side has a very thick/high layering, your print will be missing the impression of the layers from the"lower" side. If using clay instead of paper, you should also be mindful of how thick your clay slab is, otherwise the collagraph may break it.
As an additional step, you can fire the clay and use the surface as another reusable stamp, or you can incorporate it into a slab for another clay project. The advantage of the collagraph is that you can create your design and reorganize it as many times as you want before gluing it. Your collagraph can also be reusable for many surfaces to create a series of prints. Additionally, it can reduce time if you want to create a more perfect pattern (refer to the last image).
Below are three videos of how a more traditional collagraph on paper with ink works:
History
Collagraph printmaking emerged in the mid-20th century as an experimental and accessible technique where artists built a printing plate using textured materials like fabric, cardboard, leaves, or glue to form a collage. The plate is then sealed, inked, and printed either as an intaglio (ink wiped into recessed textures) or relief (ink rolled onto raised surfaces). Collagraphy is valued for its tactile surfaces and versatility, therefore making it ideal for expressive and abstract art. It's often associated with mixed media and contemporary art. It has gained popularity in art education due to its low cost and adaptability to diverse themes.
Contemporary Artist
Click on images to expand!

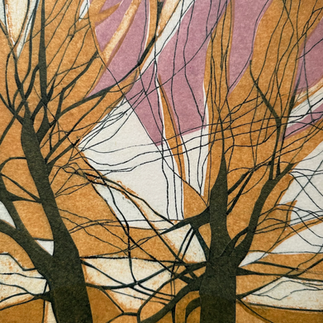


Marta Dyer-Smith is a UK-based printmaker and educator specializing in collagraph and mixed media printmaking. Dyer-Smith appreciates the experimental nature of collagraphy since it allows her to explore a wide range of textures and materials. She often combines collagraph with techniques like intaglio, relief, and monotype printing. As a result, abstract landscapes and nature-inspired motifs made from layers emerge. Her work emphasizes playfulness and innovation as she pushes the boundaries of traditional printmaking to achieve captivating depth and nuanced tonal values.
Intaglio Printing - Drypoint
Intaglio: Intaglio is a printmaking process where the image is created by incising or cutting into a plate, like metal or plexiglass, rather than raising the image as in relief printmaking. Ink is then applied to the plate, and the excess is wiped away. This leaves the ink only in the incised lines. Damp paper is pressed onto the plate and used to transfer the inked image.
Drypoint: Drypoint is an intaglio printmaking technique that creates sharp lines with fuzzy, velvety edges. A diamond-pointed needle is used to incise lines directly into a bare printing plate, displacing ridges of the plexiglass or metal plate that adhere to the edges of the incised lines. This displaced metal is called burr. Inking fills the incised lines and clings to the burr. Damp paper is placed on the plate and run through a press, picking up the ink from the incised lines and the burr, resulting in a characteristically fuzzy line.
Click on the image to expand!

MATERIALS
Plexiglass (thickness varies) or metal plate
Dry point/etching needle
ALT: could also try other cheap pointy materials like sewing needles with metal handles, coat hanger wire wrapped around tape, metal skewer, metal nail file
Akua Intaglio Water-Based Ink (great for beginners and easy to clean plate off with some soap and water)
Tarlatan
ALT: any loose-weave cloth
Squeegee
ALT: old card
Tape
Printmaking paper
Warm water bath
Gloves!!!
Click the slideshow images to view steps!


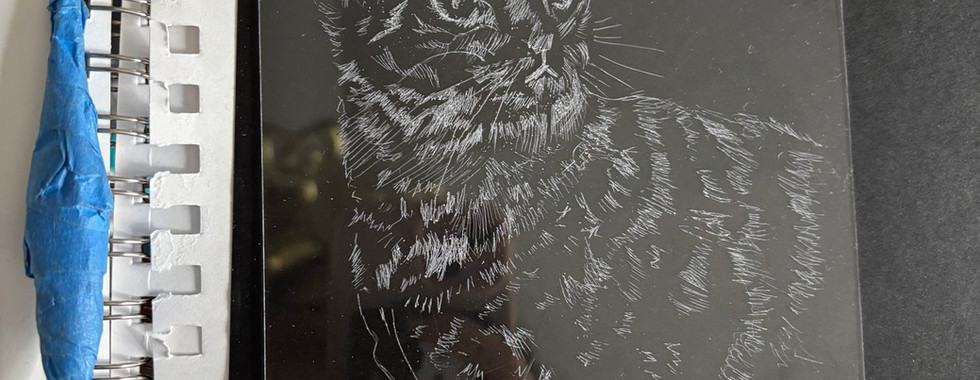


Steps:
Start by creating a drawing on paper. Try to focus on thin and thick lines with lots of texture that can be shown with the scratching.
Place your plexiglass on top of your drawing and tape it so it doesn't move around as you trace with your etching needle.
Place a black paper underneath your etched plate to see where you may be missing details.
BEFORE INKING: DRAW A WARM WATER BATH — the length of how long your printmaking paper should soak varies. Higher quality paper can take up to an hour while lower or thinner paper can be soaked for 5-15 minutes. I used very thin handmade recycled paper, so I only soaked it for 5-10 minutes.
Apply a few dots of ink onto your plate, particularly where you etched. Usin a squeegee, scrape your ink from ALL directions to make sure the burr retains it.
Use a tarlatan and GENTLY wipe off leftover ink. Do not overwipe!! I find it best to use a semi-dirty cloth because it won't overwipe
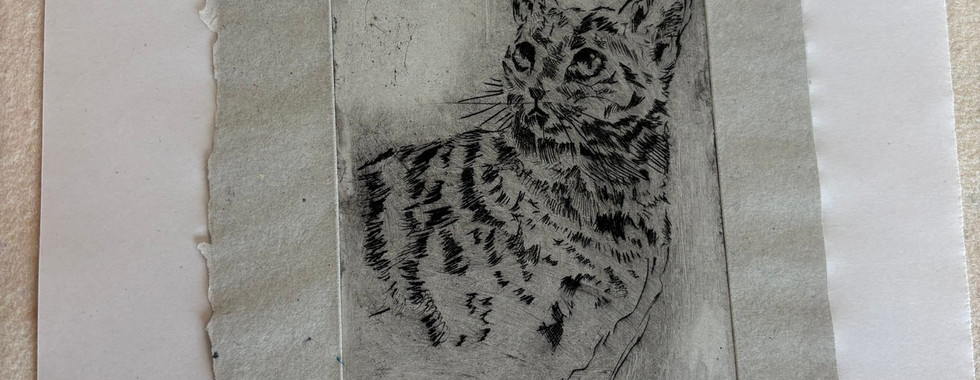
Wash your hands, then take your paper out of the water bath.
Blot your wet paper between 2 other pieces of paper until there is no more shine and it is simply damp.
Adjust your printing press, then place a piece of newsprint down. Lay your damp paper on top of the newsprint. Lay your plexiglass on top of your damp paper with the ink side facing it (your image will be mirrored). Lay another piece of newsprint on top of your plexiglass.
Cover your sandwiched plexiglass with the printing press cushion and start turning the handle. Run it at least two times under the press, forwards and backwards.
Take off the cushion and newsprint to reveal your gorgeous print!
Check out these videos for visual aids - The second one is a nice alternative if you have no printing press!
Techniques & Tips
My favorite type of printmaking is drypoint. It is very similar to drawing, and I love the soft and misty effect the final print gives off. I would recommend using a flashlight in addition to your dark piece of paper underneath so that you can see your etching marks more precisely. Make sure to adjust the pressure of your etching needle so that you get a variety of thin and thick expressive marks. You can also play around with how much ink you want wiped off your plate and create intentional darks and glows. Creating tri-colored prints would also be a nice exploration that relies on heavy isolation.
History & Artist Rembrandt
Click on images to expand!


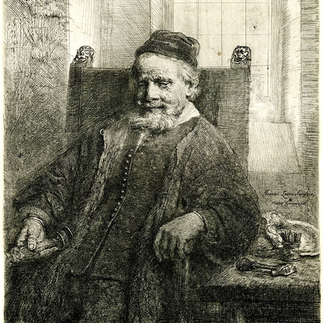


Drypoint is an intaglio printmaking technique developed in the late 15th century. Here, artists use a sharp needle to scratch directly into a metal crate to create a burr that holds ink and produces rich, velvety lines. Rembrandt van Rijn, the 17th-century Dutch master, is one of the most celebrated drypoint artists. He used the technique extensively in combination with etching to create emotionally resonant and atmospheric prints. Rembrandt was drawn to drypoint for its expressive line quality and ability to convey depth, mood, and spontaneity. These are all qualities that aligned with his interest in human emotion and dramatic storytelling. The softness of the drypoint line gave his prints a unique warmth and intimacy that other methods like engraving couldn’t achieve (since engraving has cleaner and more precise lines).
Screen Printing
Screen printing: A printing technique where a mesh is used to transfer ink onto a substrate (base material where the image is being printed - could be paper or a shirt), except in areas made impermeable to the ink by a blocking stencil.
Click on the image to expand!

MATERIALS
Mesh fabric stretched over something (I used an old container I found that was already stretched)
ALT: stocking stretched over embroidery hoops or frames
Screen printing ink
ALT: any acrylic ink
Mod Podge or Emulsion
ALT: cheap Elmer's glue
Painbrush
Paper
Medium or thick Sharpie
Squeegee
ALT: old card
Palette knife or spoon
Click on the images to expand!


Steps:
Find some kind of mesh fabric - this could be from old scarves or even stockings.
Stretch your mesh over a tight surface (could be embroidery hoops, or in my case, I had a lid from a mesh container that was already stretched).
Choose a simple line drawing that you want to use as a stencil and draw it on a piece of paper.
Cover your paper with the hoop's mesh side facing the paper (refer to photo) and use a thick Sharpie to trace your outline. Make 2 drawings.
Using a brush with Mod Podge, paint AROUND all of the lines. This print will be your positive image, and the ink that transfers will be like the Sharpie lines you made.
Paint ON TOP of the lines in your second drawing. This print will give you a negative image, meaning the lines you drew with your Sharpie will be the same color as your base paper while the ink will surround it.
Let the glue dry overnight.
Create an elevated surface for your hoop (I taped pens to the table, please refer to image). You would not need to do this if using an embroidery hoop—simply turn it so the mesh side is facing up and not down anymore. I couldn't flip my lid because if I did, the hoop caused the mesh to be too high to scrape properly downward.
Apply a generous amount of screen printing ink or acrylic paint to the top of each drawing, then use an old card to scrape down at an angle. Repeat carefully until whole stencil created with the glue is fully covered.
IMMEDIATELY WASH MESH WITH HIGH PRESSURE WATER so that the ink doesn't dry and cover up the rest of the glue stencil! The goal is to be ab le to reuse.
To clean up the lines on your print before ink dries, you can use a thin, blunt tip like the tip of a mechanical pencil (no lead) to kind of swoop the ink away. I used a black colored pencil since it matched the color of my paper.
Yay! You now have some pretty cool prints :)
Check out this video for visual aids! He also talks about using emulsion instead of glue:
Techniques & Tips
Making your own screen at home can be tricky because the right material can be hard to find. The goal is for it to have the tiniest little holes as possible, and you must stretch the fabric as tightly as possible around your hoop. When using glue as a masking stencil, I think it's better to create thick layers so that no ink can penetrate when you scrape it through the mesh. In the future, I think I would have added another layer of Mod Podge so that I don't need to clean up the print at the end.
History & Andy WARHOL
Click on images to expand!


Screen printing, also known as silkscreen or serigraphy, has ancient origins in China. Chinese artists used stencils and mesh to apply designs on textiles. Later in the early 20th century, it was adapted for commercial use by the West. It rose in popularity and became a common method for mass-producing posters, advertisements, and textiles. In the 1960s, Andy Warhol revolutionized screen printing by using it as a fine art technique within the Pop Art movement. He chose screen printing for its bold and graphic qualities as well as its ability to reproduce images over and over again. This mirrored mass production and consumer culture. Warhol famously used this technique to print portraits of celebrities and everyday objects such as Marilyn Monroe and Campbell’s Soup Cans. His repeated use of recognizable brand names and mass-produced items in a fine arts context highlighted the commodification of art and the increasing commercialization of society, which in turn blurred the lines between high and low art.
Reflection
Printmaking is an enjoyable medium for playing around with positives and negatives and how they interact with each other and/or the layers underneath. Gelli printing involves several found objects whose prints could serve as backgrounds for other pieces, thus creating the effects of a collage. You could also repurpose those prints and recycle them for other projects like origami! Pattern-making with linocut and foam prints could also allow for the exploration of color combinations as you make multiple prints next to each other, and all of those together or separately could represent specific emotions related to the image you printed. A printmaking series could also be used to tell a story or as commentary on social injustices because of the history behind the medium. To learn more about that, check out this page. My personal favorites were drypoint and screen printing. I loved how I was able to mimic drawing since that is my concentration, while also taking it to the next level by adding more texture and moody effects with drypoint. Screen printing also allowed for me to think outside the box for other cheap materials I could use with my students, and although it's not as effective as the real deal, it still works and can be adjusted.
For the Classroom...
How to empower students' inquiry:
As an educator, I would encourage students to ask investigative questions before starting a project. Such as...
What is the message I want to convey?
How can choosing this technique or combining these two techniques successfully portray my message as opposed to others?
What do I want the viewer to feel or notice? What type of print or how should I carefully curate my print so that feeling is evoked?
What surprises or accidents happened in my process and how can I use and embrace them?
What artist could I research to help me find inspiration and what could I take form their process and apply it to mine?
I would also like students to keep a printmaking journal where they can keep track of their progress, learning, and findings. This could be their sketchbook so they can look at the notes they've taken as they've experimented and played with printmaking - kind of like little scientists! It would include their trials, failures, and discoveries. This would also be great for me to keep track as a formative assessment to see their progress, and as a summative assessment in the end so I can see how much variety of play they put in their journals and how they translated their findings in their final print(s).
Additionally, I'd encourage students to consider "What if" scenarios as they do their printmaking:
What if I added another layer of color?
What if I tried a nonconventional tool like a spoon to carve?
What if I flipped or rotated my image as I continue printing?
What if I overinked or underinked on purpose? What deliberate result or effects could that yield?
Challenges/Prompts to Inspire Creativity, Play, and Exploration
Accommodations
Project Ideas
Safety & Health
Reference:
Hafeli, Mary Claire. Exploring Studio Materials: Teaching Creative Art Making to Children. Oxford University Press, 2015.
Comments