Found Objects/Photography Exploration
- Daniela Reyes
- Dec 5, 2023
- 6 min read

Join me on an exploration of arranging found objects and taking photos!
Very rarely did I make art from found objects when I was in school. I only remember working with them when they were needed for a collage. I also never took a photography class, nor did my high school teachers incorporate photography into their 2D curriculum, so I had 0 background knowledge going into these explorations. It was very interesting to see how these two mediums could work on their own and together, though. I would argue they require more creativity than previous mediums I've explored!
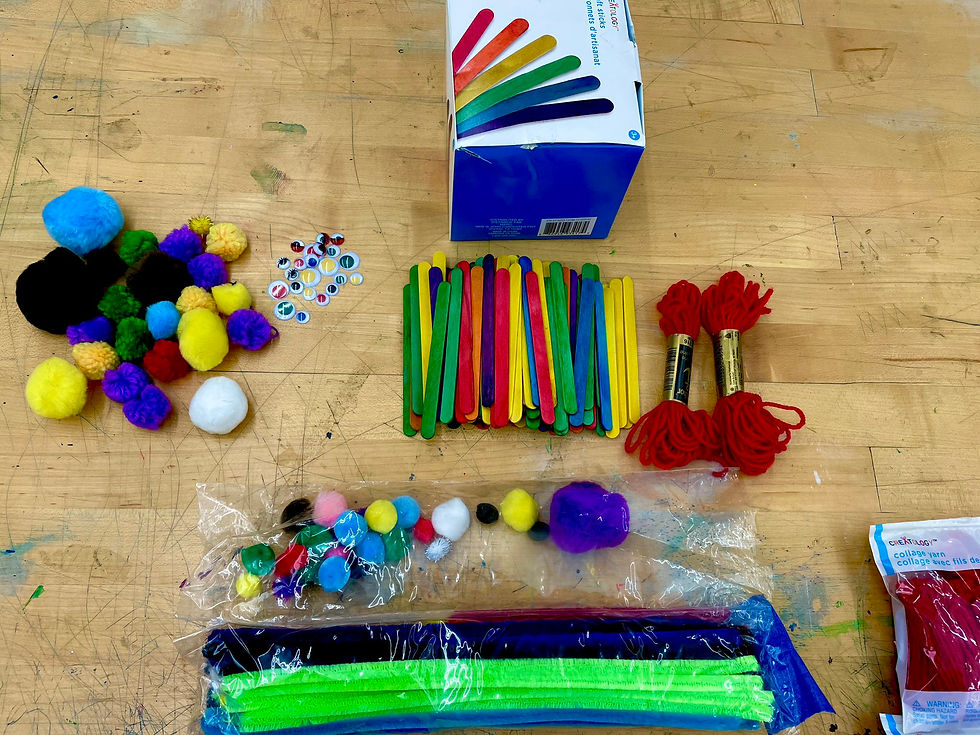
MATERIALS
Popsicle sticks
Pompoms
Yarn
Googly eyes
Pipe cleaners
ANY other found objects haha...
Phone or any device with a camera
Exploration
Click on image to expand!

Found Objects
Click on images to expand!


To assemble this project, my groupmates and I arranged our found objects by their type. We first focused on the feeling of the objects and what they reminded us of to create an artwork based on that. The bright colors and craft material were reminiscent of our childhood, therefore we decided to create a little family scenery with pets. To make it match a 2D curriculum, we were thinking of having kids snap pictures of their scenes and print their images to tell a story.
Found Objects with Photography
Click on images to expand!


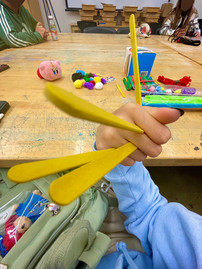

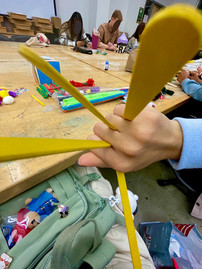


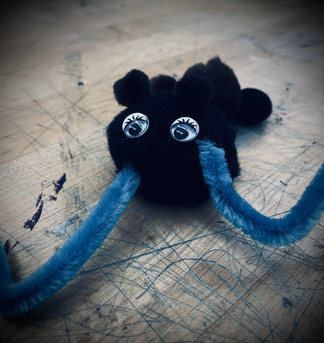
For the popsicles, I played with my phone camera settings to achieve a foreshortened effect. My lens was at 0.5x which expanded my camera's field of view while warping it a bit. We also had a class exercise where we had to manipulate our settings to match the prompt of our objects. My prompt was "A fuzzy cat cries softly," so I formed a little creature out of pom poms and used the blue pipe cleaners to resemble tears. I then put the dramatic cool filter on my photo, decreased the brightness, added a black vignette, and removed some saturation. I was able to match the glum feeling of the photo by changing a few things!
Techniques
Assemblage - There are multiple ways to arrange materials. You can start by having an idea in mind of what you want to make and then arranging the materials to fit that idea. You could also start by using randomized prompts or work in pairs/groups to create silly word combinations. Try arranging everything by colors, types, or textures, and let the materials speak to you. What do they remind you of? Where in real life would you see these types of combinations? If unusual combinations, maybe you could create a unique universe.
Photography - Photography can often be used to tell a story. Multiple pictures with various angles could aid in getting the full sides of the story. You can also enhance the feeling of your story or your picture by adjusting the filters/settings to match/dramatize the mood. For a dreamlike effect, I would suggest increasing brightness and warmth, then reducing the black point. For a melancholy mood, set up a dark filter and decrease both brightness and saturation.
Personal Thoughts
I believe working with found materials is the most fun and engaging. It gets you thinking on your feet due to the limited things you have available in front of you. It even boosts your creativity and ability to read what you or others have created. Composition is also important if you want your viewers to look at it a certain way, especially if it’s an abstract piece. Think about how explicit or implicit you want to be with the assemblage of your objects. It could also tell a story if you take photos and create a printed storyboard while changing the arrangements of each frame. Through this, you can turn assemblage art into 2D. Its ephemeral quality also makes it unique in that if you revisit it, chances are you won’t be able to recreate it or document it identically!
Photography, on the other hand, is a great medium that encourages you to go out into the world and take pictures of what you see. These pictures can tell your personal stories or work as documentation for the lives of others. There are several ways you can manipulate the pictures by playing around with the angles or the filters. The weirder or more intense the angle, the more dramatic the quality of your work will be. The more intense the filter is, the more you can cater the effect to match the mood of the environment you’re in.
Additional sources for help!
Assemblage Inspired by Louise Nevelson Art Tutorial - Art With Trista
An Assemblage of Familiar Objects | Alfonso Ossorio | UNIQLO ARTSPEAKS
How to Edit Photos on Your Phone: Apps and Presets *beware of anything that requires payment or uses ads
Exploring my Theme - Cat Characteristics
Inspiring assemblage artist who has a creature series: Laurie Schnurer
Other amazing assemblage artists not related to my theme: Stephen Palmer, Katherine Virag
Inspiring photographer who has a pet series: Karen Hoglund
Other astounding POC photographers not related to my theme: Joshua Rashaad McFadden, Graciela Iturbide
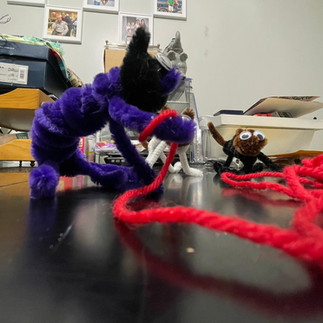
Found Objects (With Differing Photo Angles)
Click on images to expand!


Photography
Click on images to expand!


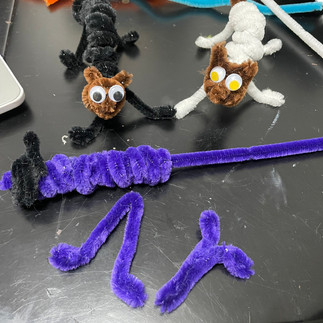
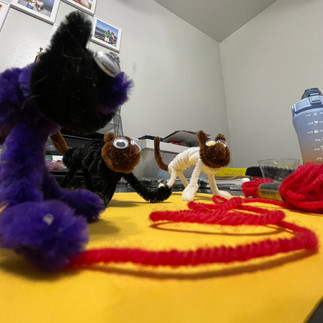
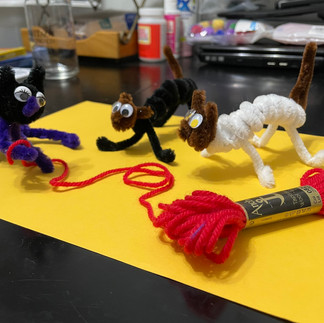
I combined both found objects and photography for my pipe cleaner cats. Because I had a very moldable material, I was able to create shapes of cats with different body languages. Once I made the cats, I figured something was missing so I added yarn to bring the scene together. Their curious characteristics with their body language become apparent once you see the different angles of the scene. I changed the heights at which I took the pictures and switched between 0.5x and 1.0x to mimic worm's and bird's eye views. With this, you can see how the cats are intrigued by the yarn. The process of making the cats and playing around with their positions was extremely fun. Had I continued, I would've created more scenes with the three of them to create a story.
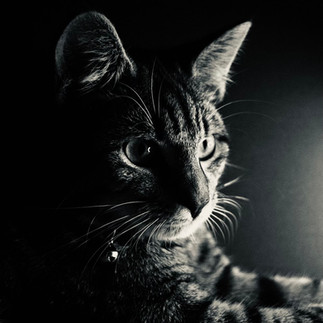
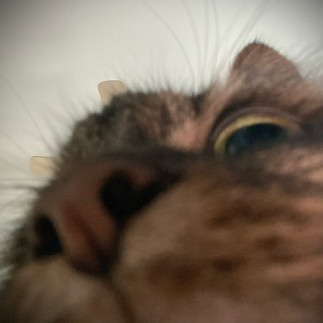
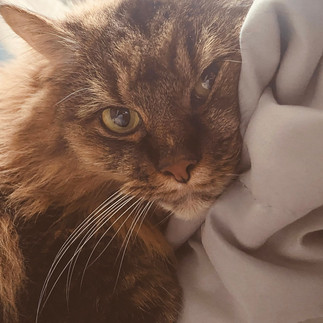
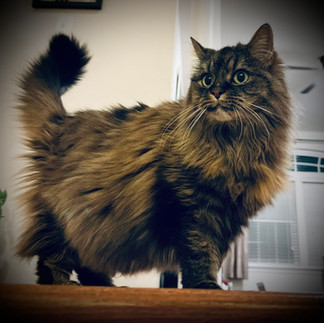
The bottom photos are iPhone pictures of my friends' cats that I manipulated to match their characteristics. The angles are varied along with the poses. Some of the cats' traits are curious, bold, elegant, and sleepy. Drastically increasing contrast and taking away colors can give you a bold look like the cat in the top left, whereas decreasing the black point and adding a warm filter can give you a dreamy/hazy effect. Exploring my phone's settings allowed me to expand my knowledge of photography despite not having a professional camera, and students can do this as well.
For the Classroom...
Age appropriateness & behavioral expectations:
There are different age groups for assemblage and photography. Assemblage can be introduced at any age, although you should supervise pre-K and kindergartners to ensure safety in handling the materials. As for photography, younger kids should use a school-provided laptop or tablet while middle/secondary schoolers may use their phones or school-appointed cameras.
Young students should not eat any of the found materials, please supervise well
Students should be open to sharing their materials if working as a group
Students should always keep an organized space with their materials and clean up appropriately
If using a phone for photography, students should wait for their teacher's approval before downloading any editing apps
Students should ONLY use their phone for the assignment (and not go on Snapchat, etc.)
Accommodations
Always have a box of found objects or recycled material in your classroom for students who are unable to bring things from home
To make things easier for students, have them practice sorting exercises with the found objects before creating final pieces OR provide randomized prompts
Have students work in groups to be inspired by their peers and to ensure everyone has material (sharing)
For students with tactile sensory issues, provide them with multiple material options
Allow students various options for photography (phone, professional camera, tablet, etc)
Students who do not have a photo-taking device should ask a classmate or their teacher to take a picture, then students should use their school-appointed laptop to edit it
Students should handle any school-provided technology with care
Project Ideas
Create a fantasy world of the found materials around you
Create a mystical creature and change its movement as you take pictures. Print them out afterward or create a GIF
Think of your favorite memory with family/friends. Recreate it with found objects and construct the different scenes that make up that memory. Take pictures of each scene and print them out to form your story
Take self-portraits or portraits of someone close to you. Have the setting/background be telling of who you/they are
Document the life of your pet or someone you know. Manipulate the lens, filters, settings, etc. of your camera to match the scenery
Go on a nature walk and take pictures of the scenery that unfolds as the sun sets. Edit and print the photos to create a mini-series based on progression
Safety & Health
Younger kids should be supervised so they do not eat anything when they're exploring assemblage. With that being said, manage the kind of found material students are allowed to bring from home/what you provide. Perform demonstrations at the beginning of class if introducing students to a professional camera so they handle it safely. Also, ensure that the editing apps students use follow the guidelines of your school. Beware of anything that costs money or uses ads. Lastly, always supervise your students if they're using their phones so they're not distracted or sharing personal information with an app you did not approve!
Reference:
Hafeli, Mary Claire. Exploring Studio Materials: Teaching Creative Art Making to Children. Oxford University Press, 2015.

Comments