Watercolor Exploration
- Daniela Reyes
- Nov 23, 2023
- 4 min read

Updated: Dec 7, 2023
Join me on an exploration of watercolor's versatile effects!
Watercolor can be a very tricky medium. The last time I used it was in high school, and because it was hard to work with, I decided to avoid it at all costs. Little did I know that a simple exploration could help me understand it better and apply some techniques to make the experience easier and fun! Revisiting watercolor has taught me the importance of patience and balance.


MATERIALS
Watercolor palette (PRANG & Shuttle Art)
Watercolor pencils (Faber-Castell, Prismacolor Premier, Artist's Loft)
Paintbrushes (round, flat, detail, sponge)
Paper (watercolor paper, mixed media, toned gray)
Plastic wrap
Rubbing alcohol in spray bottle
Salt
White oil pastel (or any white waxy stick like a crayon)
Watercolor Exploration
Click on images to expand!

Palette Watercolor Pastels
Click on images to expand!


Watercolor pencils
Click on images to expand!


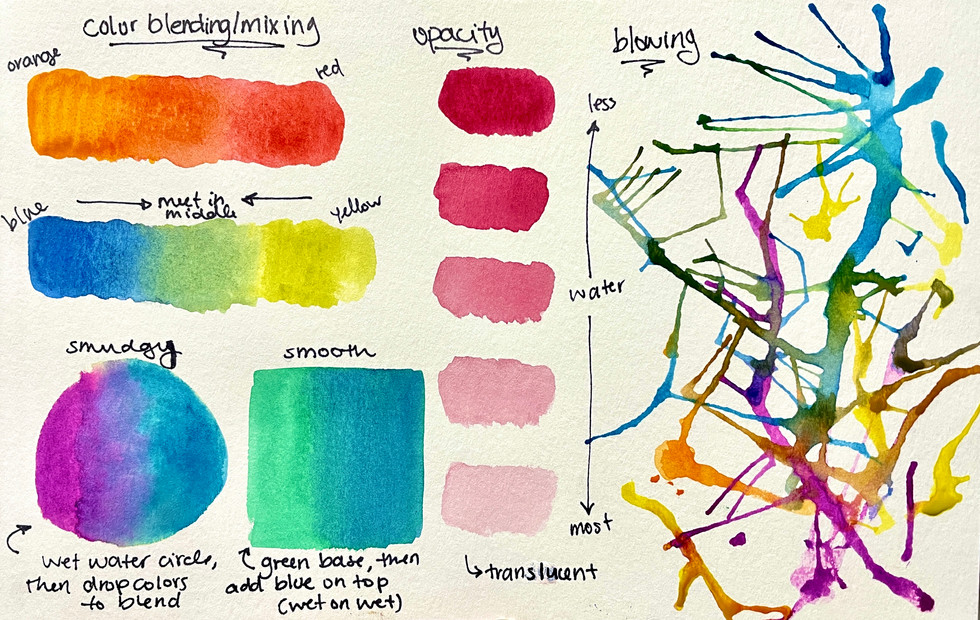
Watercolor Techniques
There are so many techniques you can use when it comes to watercolors! Please read my notes for specific explanations. You can vary how pigmented you want your colors to be by varying the amount of water (inverse relationship). Less water = more pigment. More water = less pigment. To get smooth blending, I'd recommend doing wet-on-wet blending. For more dream-like blending, you should apply a water base (wet the paper), then drop the colors with the tip of your brush to let them mix. Some really fun effects that can add texture include dropping alcohol, blowing, covering the wet paint with plastic wrap, drawing a white oil pastel base, using a sponge, and using salt!
Watercolor pencils are best for more detailed paintings since you have a fine tip. Play around with dipping the pencil into water then drawing with it, drawing on top of a wet base, or using a brush to wet the tips and then painting with that brush. For texture, you can choose how much you want the pencil marks to show. Lastly, I found blending to be easiest when hatching first and then applying water.
Personal Thoughts
For wet media like watercolor, the movement of the brush as well as the paint to water ratio is what creates a wide range of effects. You can obtain beautiful layers by waiting for one coat to dry and applying another on top to intensify the pigmentation and create dream-like effects. Its softness allows for more quiet tones of color that could represent memories or reminiscence in a painting. By adding more paint to the brush you can make the piece sing, whereas adding more water mutes it ever so softly. Watercolor’s ability to flow by blowing it around your paper also gives you more freedom to create a loose artwork focused on movement. Wet-on-wet painting with watercolor is best for when you want to blend colors on the paper instead of beforehand, and the evidence of that color mixing on the page (since the blending marks won’t always go away) shows the progression of the piece as well!
Additional sources for help!
Exploring my Theme - Cat Characteristics
Inspiring watercolor artist who has a cat/animal series: Svetlana Novikova
Watercolor Palette
Click on images to expand! **Whiskers were added with a white gelly roll pen once dry :)


I chose to paint a sleepy and peaceful cat for this medium exploration. Because he's sleeping, I thought watercolor would be the perfect choice to fit the soft mood. I decided to use dark, cool colors for the shadows and light, warm colors for the highlights. The sunlight was hitting this kitty from the right so he looked very warm, therefore I chose to emphasize that with my choices. I decided to incorporate wet-on-wet techniques for the blanket to give it a more blended look. Once the first layer was dry, I would apply other wet-on-dry layers for a tint effect so there wasn't a huge contrast between the orange and purple. The opposite is true for the cat, however. I wanted there to be more contrast between the colors so you could see the mark-making. By turning the reference image to grayscale I was able to see which values of orange, yellow, green, and blue would fit the ones in the picture. Adding more water to the colors softened/lightened them up while adding very little kept them pigmented and dark. Overall, I learned the importance of that paint-to-water ratio and the different ways of applying colors!
For the Classroom...
Age appropriateness & behavioral expectations:
Watercolors can be used with all age groups. Lower-quality watercolors will not be as pigmented, but the younger kids could explore them more freely. Higher quality watercolors and watercolor pencils can be introduced in secondary school for more responsible students.
Students should mix their watercolors separately in another palette or the side of the watercolor palette to avoid the original watercolors mixing.
Students should always rinse and then wipe their brush on a paper towel before dipping it back into the palette for a different color.
Students should only start by adding a little bit of water into the watercolor, then gradually more if they want it diluted. Never too much water first!!
Accommodations
Students who don't like watercolors could explore colored ink and varying with water. Alternatively, making "ink" from charcoal or graphite powder could be explored by older students.
For students who have motor issues holding the brushes, thicker brushes may help.
Students with injured hands could be more experimental and make watercolor "blob" art where paint drops are added into splotches of water on paper!
Students with sensory issues should be provided with gloves
Project Ideas
Recreate one of your dreams using at least 3 watercolor techniques
Paint a landscape of your favorite place using warm and cool colors
Blow watercolor paint drops on your paper, then create an artwork based on your mark-making (you can paint manually with a brush afterward or add pen doodles over it)
Create a black-out poem and then paint the new sentence(s)!
Safety & Health
Before introducing this in a classroom, it's important to analyze any potential dangers with this medium. Watercolor is generally nontoxic, although you should always check that they have the AP seal. Students should also work in ventilated areas and wear gloves if they have skin irritations.
Reference:
Hafeli, Mary Claire. Exploring Studio Materials: Teaching Creative Art Making to Children. Oxford University Press, 2015.

Comments